
The Zenlayer Console is an online portal for self-deploying a portfolio of Zenlayer services, such as the Zenlayer Global Accelerator (ZGA) and Zenlayer Bare Metal Cloud (BMC). In the Console, you will find a range of flexible self-service options. For example, you can easily set up bare metal cloud (BMC) instances and build virtual private cloud (VPC) networks over this platform — deploying flexible L2 networks in a matter of minutes. VPC gives you a secure, hosted, on-demand cloud environment that is highly scalable and cost-effective.
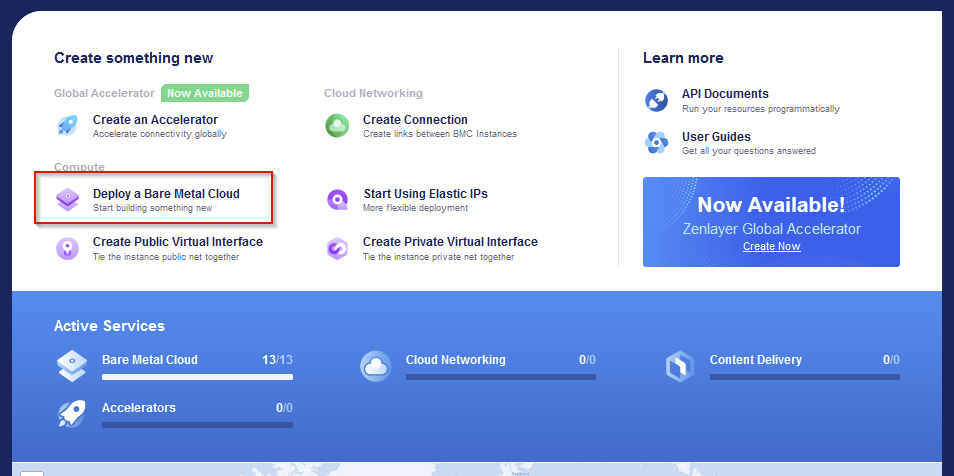
It’s fast and easy to set up a VPC network from the Zenlayer Console. To start, head over to the Zenlayer Console and go through the login process. After logging in, select the option “Deploy a Bare Metal Cloud” to deploy a BMC instance.
If you already have some BMC instances in place, you can view them at the bottom of the screen under “active services.” BMC instances typically have one WAN interface, and one LAN interface. The WAN interface receives a single public IP address, and you can access it directly from public internet.
Follow the steps to set up additional BMC instances, then visit the summary page. At this point, you can choose to set up either a Public Virtual Interface or a Private Virtual Interface and build a VPC network over your BMC instances.

Let’s use Public Virtual Interface VPC as an example. The process for building a Privacte Virtual Interface is very similar. The main difference is that a Public Virtual Interface VPC will use WAN interfaces from BMC servers, while a private one will use LAN interfaces from BMC instances.

Select the option to create a public virtual interface VPC and follow the steps to complete the setup. One thing to note is that the service provides multiple subnet IP address ranges. Specify the IP address range to support the number of instances you would like for your VPC. Keep in mind that each VPC must be within a single dedicated edge zone.
After creating the public virtual interface, click on the resources button and then the ellipses which should expand to “assign”.
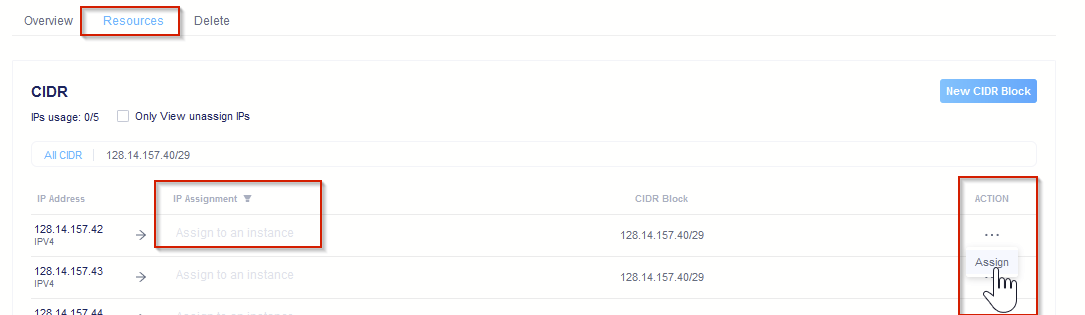
The platform then gives you the choice to select available BMC instances in the IP assignment field. You can assign a single IP address to each BMC instance. If you need to change the mapping, just click the ellipses in the action column, and you can reassign or delete that row.
Upon completion, a public virtual interface VPC will be ready for use with your available WAN interfaces over the assigned BMC instance on a dedicated VLAN.
Want to build a private virtual interface VPC? The process is very similar. For a more comprehensive walkthrough, Zenlayer is standing by to help. Send us a message and our team can walk you through each step of the process.
When you’re ready, head over to the Zenlayer Console and sign up to build and deploy a VPC.