
About the Author:
Seagle Yang is a Product Architect and resident Bare Metal guru who’s been with Zenlayer for over 5 years. He has over 20 years of experience in the industry as a Business Solutions Architect with expertise in system and network design and administration. Seagle loves taking on new technical challenges so he can keep learning and picking up new skills as he works to overcome them.
Introduction
Hi everyone! Today we’ll be going over the steps to creating a Kubernetes cluster with Talos on Zenlayer Bare Metal.
This guide is great for anyone who wants to deploy their own Talos-based Kubernetes platform to simplify their container build.
Talos is a container optimized Linux distro, so you won’t find an SSH/bash terminal on it as it’s designed for a single purpose – to start Kubernetes. It is therefore reimagined as minimally as possible.
The key steps in this walkthrough include:
1. Creating an administrator workstation with DHCP/TFTP/HTTP as PXE/iPXE server.
2. Installing talosctl and kubectl on the administrator workstation.
3. Getting PXE environment ready.
4. Generating machine configuration files.
5. PXE install and bootstrap etcd of control plane node, then PXE install the worker node.
6. Verifying the cluster build, configuration modification and basic troubleshooting
Below is the topology of our final build, the Kubernetes components are named in blue while the Talos components are in orange:
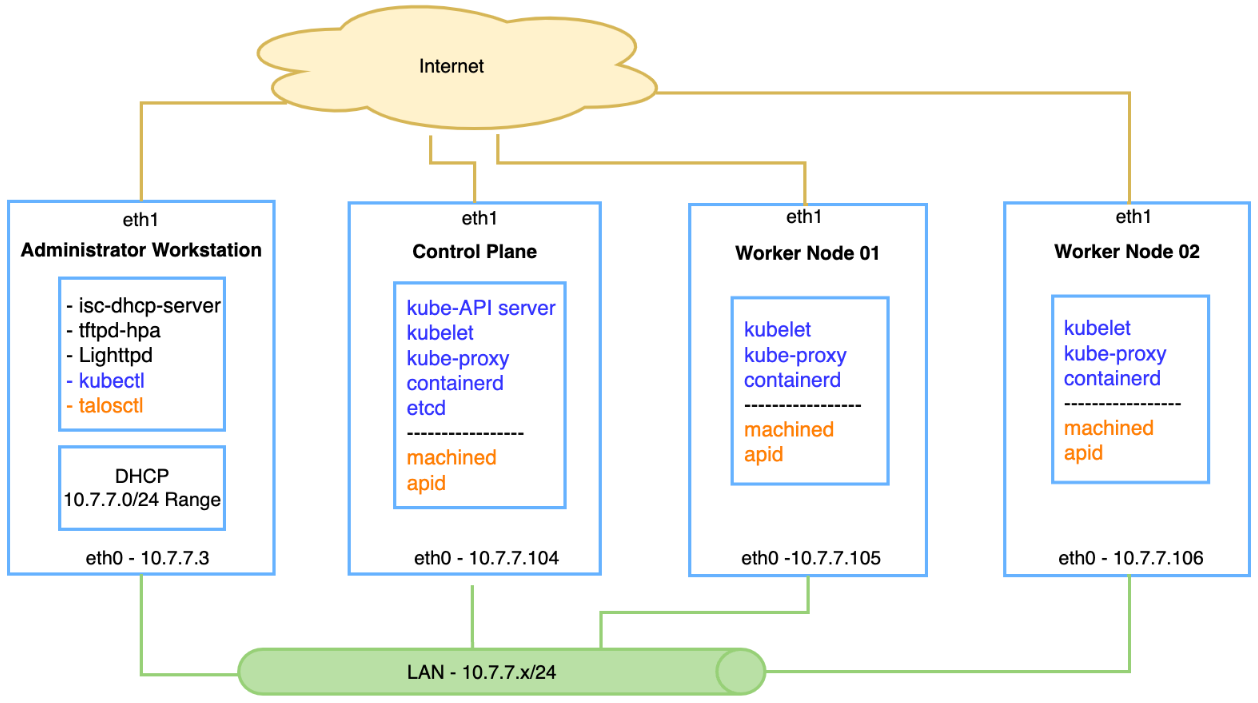
Step #1 – Create an administrator workstation and get the LAN ready:
For creating a bare metal instance and your first LAN (also known as “subnet“ in zenConsole), please refer to the section#1 and #2 of the article: Build your private cloud over bare metal
I installed Ubuntu 20.04 on the administrator workstation with the necessary components required:
1.1. with root privilege , run “apt install” to install below services:
– DHCP server: isc-dhcp-server
– TFTP: tftpd-hpa
– HTTP(S): lighttpd
Step #2 – Install Kubernetes CLI tools on administrator workstation:
2.1. For installing “talosctl“:
curl -Lo /usr/local/bin/talosctl
https://github.com/siderolabs/talos/releases/download/v1.2.5/talosctl-$(uname -s | tr “[:upper:]” “
[:lower:]”)-amd64chmod +x /usr/local/bin/talosctl
2.2. For installing “kubectl”:
curl -LO “https://dl.k8s.io/release/$(curl -L -s
https://dl.k8s.io/release/stable.txt)/bin/linux/amd64/kubectl”sudo chmod +x /usr/local/bin/kubectl
2.3. (Optional) Installing “clusterctl“
sudo curl -Lo /usr/local/bin/clusterctl
“https://github.com/kubernetes-sigs/cluster-api/releases/download/v1.1.1/clusterctl-$(uname -s |
tr ‘[:upper:]’ ‘[:lower:]’)-amd64″sudo chmod +x /usr/local/bin/clusterctl
Step #3 – Configure PXE environment:
3.1 the DHCP server configuration:
The subnet configuration part is straightforward, the configuration file is “/etc/dhcp/dhcpd.conf“. I defined a range 10.7.7.101-150 and had the service listening at 10.7.7.3 private LAN interface.
The key setting is to let DHCP server send the correct file for clients asking for DHCP bootstrap, I put an “if-else” statement for different request, as by default ipxe will issue another DHCP request and run into an infinite loop – PXE will load iPXE which will load iPXE which will load iPXE which will load iPXE…
To break the loop, the server will check if the user-class attribute of DHCP request is set to “ipxe“ and send out the “boot.script“ instead of pxe image if it is initialized by ipxe:
subnet 10.7.7.0 netmask 255.255.255.0 {
range 10.7.7.101 10.7.7.150;
option domain-name-servers 8.8.8.8;
option domain-name “zenlayer.net”;
option routers 10.7.7.3;
option broadcast-address 10.7.7.255;
default-lease-time 600;
max-lease-time 7200;
# TFTP server IP
next-server 10.7.7.3;
if exists user-class and option user-class = “iPXE” {
filename “http://10.7.7.3/boot.script”;
} else {
filename “ipxe.pxe”;
}
# fix IP-MAC binding if necessary,for you reference;
host cp00 {
hardware ethernet 0c:c4:7a:e2:df:42;
fixed-address 10.7.7.104;
}
}
3.2 The TFTP server
The TFTP server is a simple setup as it serves a single purpose in this build – to help the DHCP client initiate ipxe boot. The default configuration file is “/etc/default/tftpd-hpa“
Find the directory root and put the ipxe image into it, the ipxe image can be downloaded from https://boot.ipxe.org/
• For server with legacy boot, file “ipxe.pxe“ will serve the purpose.
• For server with UEFI boot, “ipxe.efi“ will do the job.
3.3 The http server
With the ipxe image loaded, the DHCP client will be able to pull the script or image via http. Meanwhile, Talos installation requires a yaml file for server configuration, which will be provided via http as well.
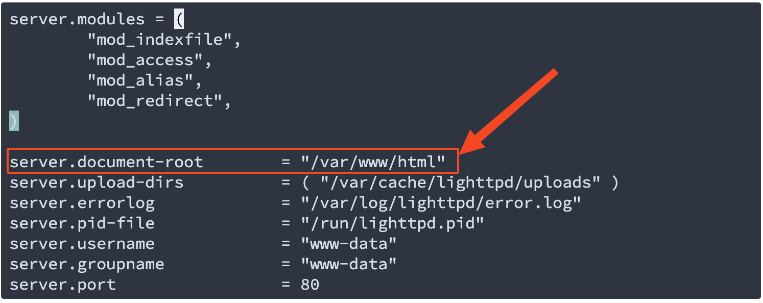
A single command line – “apt install lighttpd” will install the lighttpd and its default configuration file is “/etc/lighttpd/lighttpd.conf“
find the “server.document-root“ definition and locate the folder.
I’ve put some files in the http root folder for this build:
root@K8SController:/var/www/html# ls -l
-rw-r–r– 1 root root 297 Nov 14 23:51 boot.script
-rw-r–r– 1 root root 25321 Nov 14 23:16 cp.yaml
-rw-r–r– 1 root root 10 Nov 11 01:09 index.html
-rw-r–r– 1 root root 60337204 Oct 11 19:35 initramfs-amd64.xz
-rw-r–r– 1 root root 16031520 Oct 11 19:37 vmlinuz-amd64
-rw-r–r– 1 root root 23834 Nov 17 20:23 wk.yaml
• vmlinuz-amd64 and initramfs-amd64.xz: the Talos network booting image, which can be downloaded from Talos Github: https://github.com/siderolabs/talos/releases
• cp.yaml and wk.yaml, the talos machine configuration file in yaml format, for control plane and worker node, I will explain this in Step #4.
• boot.script: this is the key for ipxe booting, with #!ipxe header and 3 command lines – kernel; initrd; boot with corresponding parameters:
#!ipxe
kernel http://10.7.7.3/vmlinuz-amd64 initrd=initramfs-amd64.xz console=tty0
console=ttyS1,115200 selinux=0 biosdevname=0 init_on_alloc=1 slab_nomerge pti=on
printk.devkmsg=on talos.platform=metal ip=dhcp talos.config=http://10.7.7.3/wk.yaml
initrd http://10.7.7.3/initramfs-amd64.xz
boot
• Talos requires some kernel parameters that you can find here: Kernel .
• index.html file comes with default lighttpd installation.
For verification, you can issue “ss -lna“ to check for the service listening ports:
• UDP 67 – DHCP
• UDP 69 – TFTP
• TCP 80 – HTTP

You can also run curl to pull the boot.script file for testing:

While for DHCP, “journalctl -xe“ will provide more info, a decent DHCP output would be like this:

Step #4 – Generating machine configuration YAML files:
The machine configuration is in yaml format and will be sent to the server for ipxe booting, the “talosctl“ CLI tool provided by Talos can help you generate the file:
Command usage:
talosctl gen config [ClusterName] https://<load balancer IP or DNS for API endpoint>:<port>
In my case, I used a single control plane, I put “mydemo“ as clustername and 10.7.7.104 for the control plane which is the API end point:
# talosctl gen config mydemo https://10.7.7.104:6443
created controlplane.yaml
created worker.yaml
created talosconfig
I copied the controlplane.yaml file and renamed to cp.yaml and edited it, below are some key settings for bare metal setup:
4.1 – Control plane node interface and IP settings:
In this case I brought up NAT on 10.7.7.3 (administrator workstation) so that server can pull the image from internet, as all Zenlayer bare metal servers have one internet interface by default. I can actually bring up the internet address with the same yaml file and bypass the NAT.
During the iPXE boot, the server will initialize request from eth0, which is the default first boot option of Zenlayer bare metal servers, to get the network boot images and yaml file via http, then do an init soft reload and apply the yaml file.
By then, the internet interface will be up and running and the installation procedure will start pulling the latest Talos image via internet interface. I’ll show later in the section titled “Worker node configuration”,
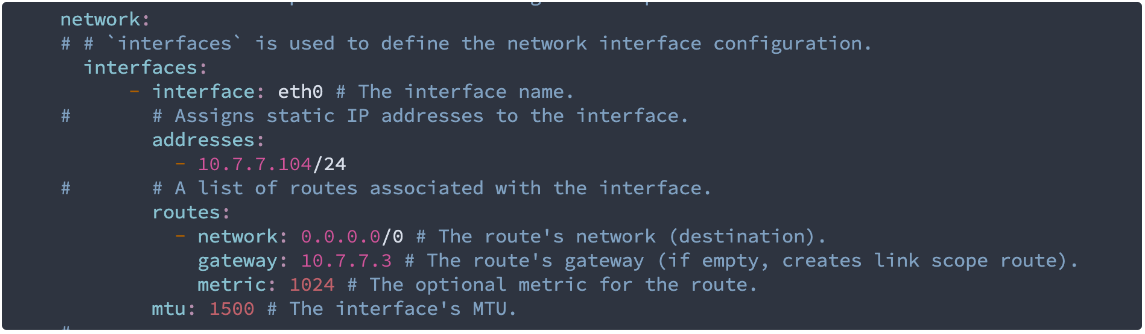
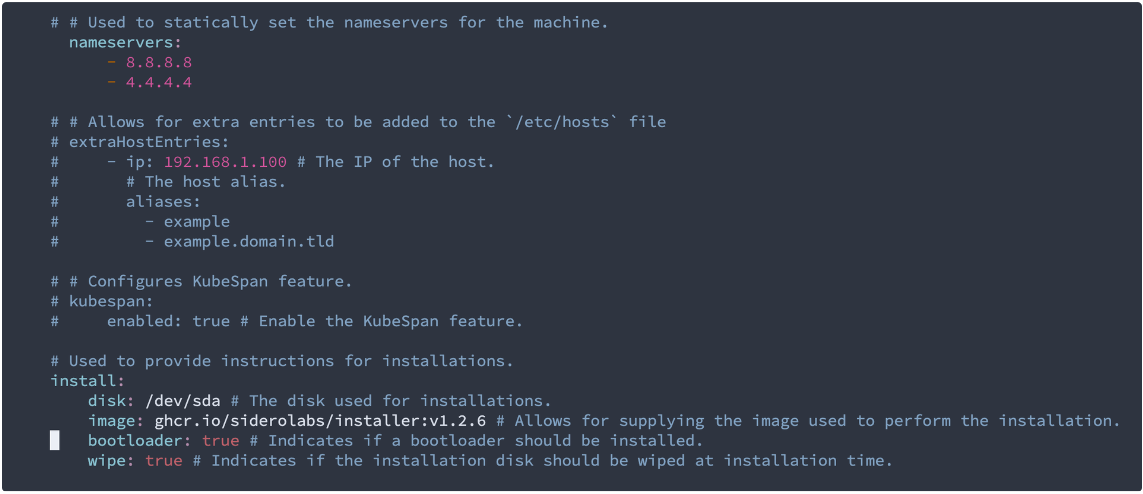
Name server settings and disk configuration, usually its “dev/sda“
I changed the “wipe“ option to “true“ so that it will format the disk and load Talos linux on it.
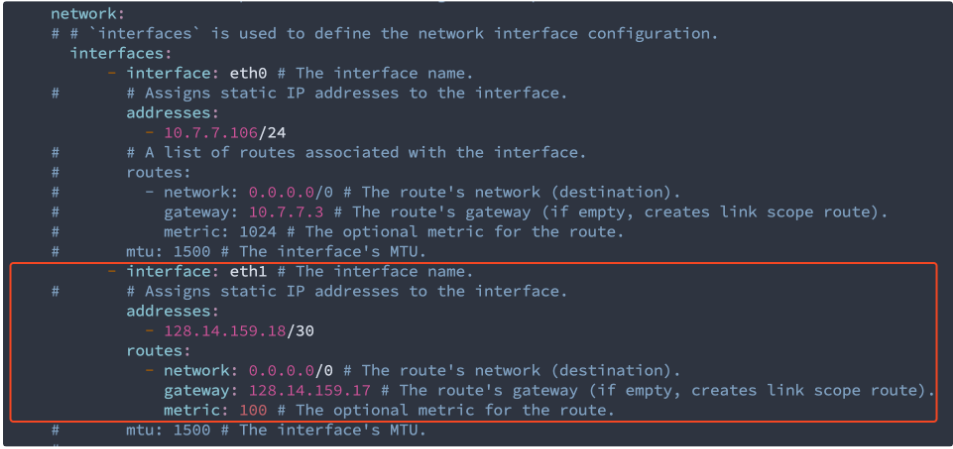
4.2 – Worker node interface and IP settings:
During the worker node setup I figured out I can assign the internet IP address via yaml file and get the IP configuration from Zenlayer console:
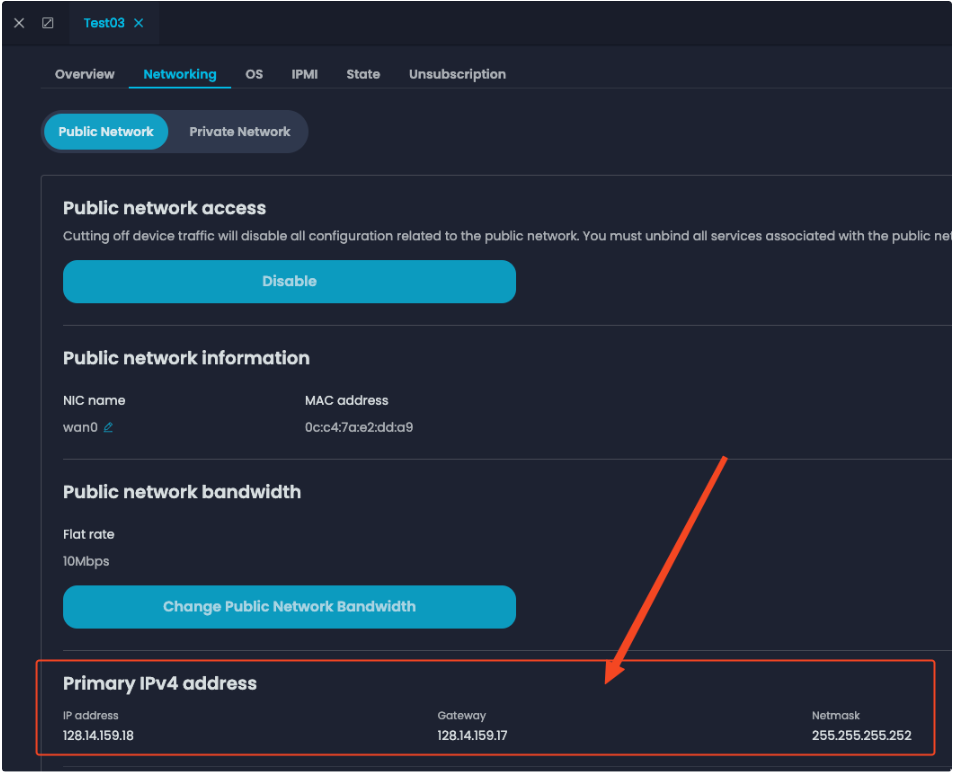
With the internet IP address and gateway information acquired, I made the yaml change to match the bare metal server internet settings. This will let the ipxe server do the network boot while all the remaining image and installation will be done with the individual server’s internet connection.
After editing the yaml file, you can run the validation by “talosctl validate –config [YourFileName].yaml –mode metal“:

REF: YAML file configuration: Configuration
Step #5 – PXE/iPXE booting and etcd bootstrap:
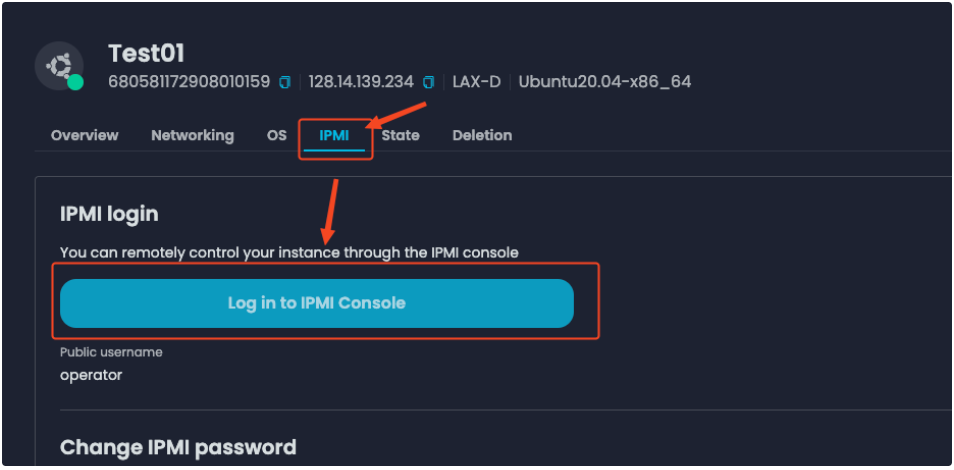
With the administrator workstation and yaml files ready, you can reboot the first server for the pxe installation. I put the cp0.yaml in the boot.script as the control plane node has to be the first server, and I can access the server IPMI interface via zenConsole to see the process:
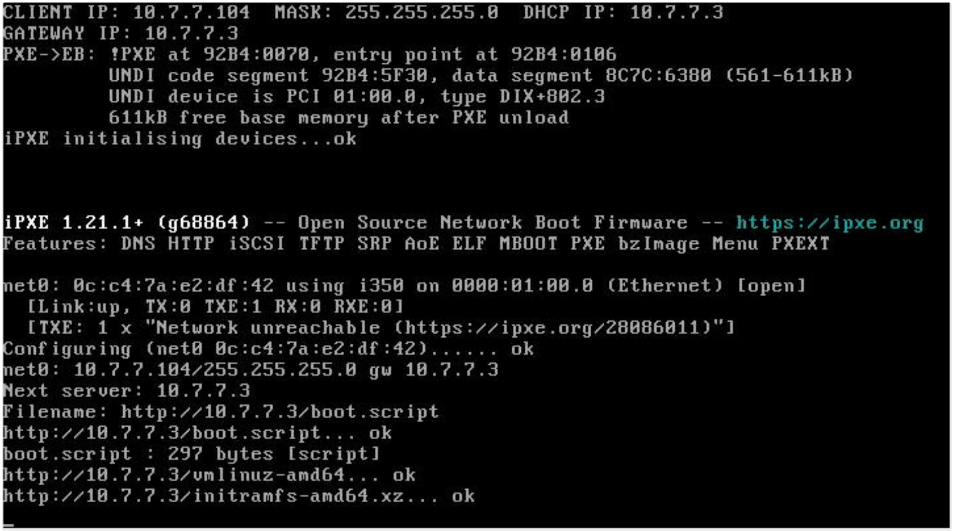
The remote console output showed the server got the DHCP assignment and started loading the network booting image:
And started the installer and wiping disk : /dev/sda
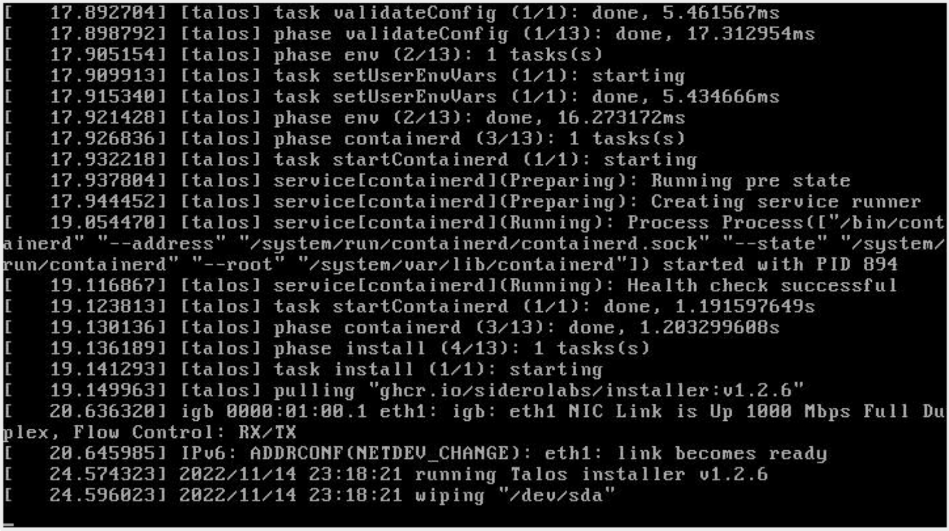
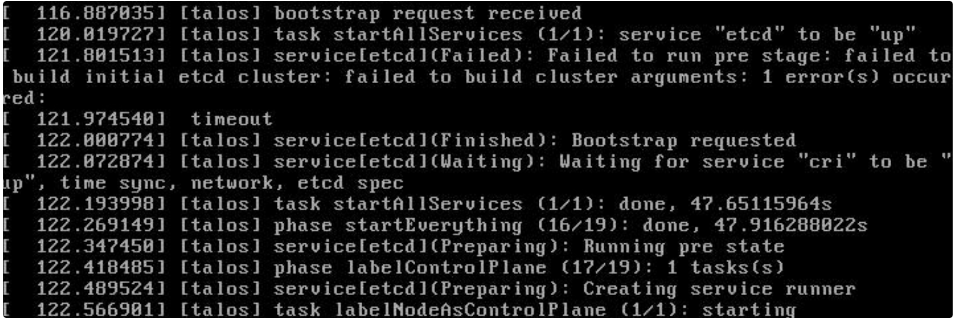
Then it will stop at ectd and wait for a special step called “bootstrap ectd“:

Then you can login the administrator workstation ( 10.7.7.3 in my lab) and execute the below commands(10.7.7.104 is my control plane node IP):
talosctl –talosconfig talosconfig config endpoint 10.7.7.104
talosctl –talosconfig talosconfig config node 10.7.7.104
talosctl –talosconfig talosconfig bootstrap
Remember that this is a required step and has to be done only ONCE during the FIRST control plane node installation. The screenshot below shows that bootstrap is done:
Then the installation will finish and you can retrieve the config and merge it into kubeconfig by a single command line. The talosconfig file was generated in Step #4, and you can run the command on the administrator workstation:
talosctl –talosconfig talosconfig kubeconfig
Check the ~/.kube/config file and find the mydemo cluster certs are merged:

Now you can use kubectl for Kubernetes cluster management:

The next step is to pxe install the worker node. I changed the boot.script file to dispatch the wk.yaml file and reload the worker nodes. The installation will do its job and you can check if the node is registered after provisioning:
*The top-left part is the screen output for the worker node installation, and the terminal windows in the background show the nodes was registered successfully, instead it shows “not ready“ for now:
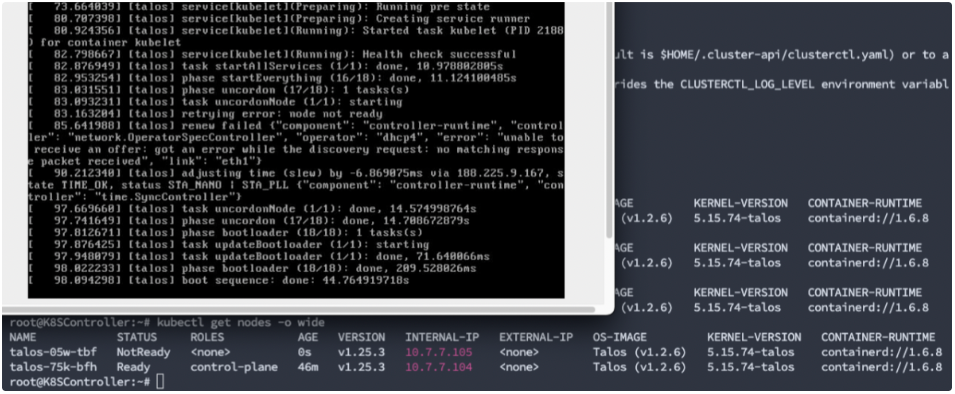
Now we can go grab a cup of coffee and let the Talos finish the job. After a while, the worker node is in ready status and we’ve got a cluster with one control plane node and one worker node:

Step #6 – Verification/modification and troubleshooting:
6.1. Label /Upgrade/healthcheck
The worker node shows as <none> in the roles column, you can set the label with a command line:
kubectl label node talos-05w-tbf node-role.kubernetes.io/worker=worker

For some reason my installation of worker node was in 1.2.5 version so I decided to make an upgrade, a one-line talosctl command will do the job:
talosctl upgrade -n 10.7.7.105 –image ghcr.io/siderolabs/installer:v1.2.6
I did the pxe booting for my last machine and got a cluster with a single control plane and two worker nodes:

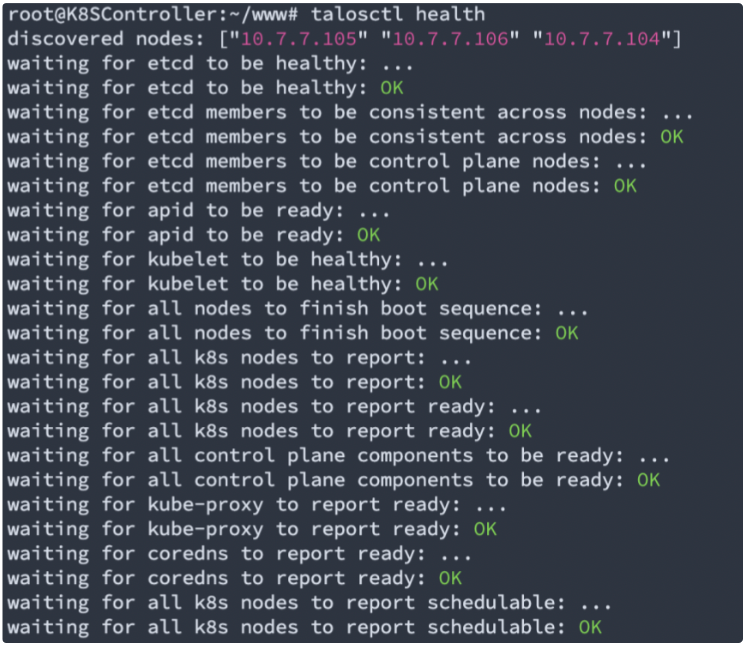
And talosctl can also make a quick health check upon the cluster status:
6.1 Machine network configuration change after installation
As Talos doesnt have ssh or terminal bash for administrators, some administrators may get lost if they want to make changes on the machine configuration – talosctl will help you out of this.
E.g, for network connectivity troubleshooting and modification, “talosctl get addresses -n [NodeIP]“ is similar to “ip a“ in linux bash:

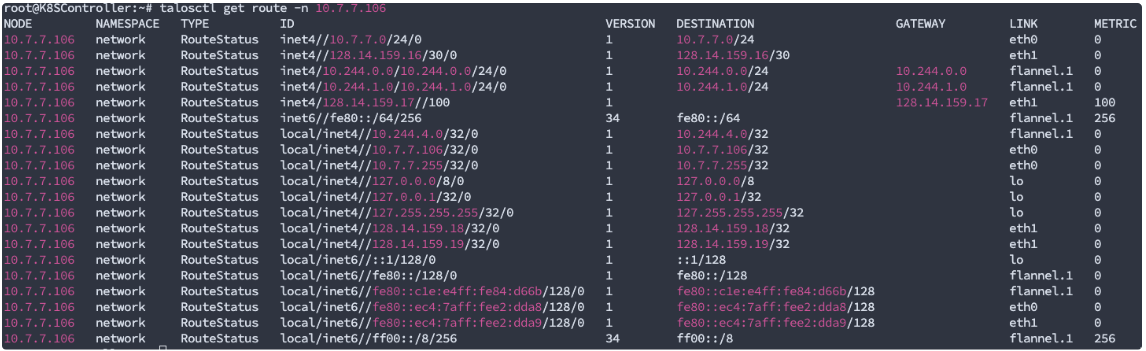
The “talosctl get route -n [NodeIP]“ will show you something similar to “ip r“ or “route -v“
When making the changes to the network, “talosctl edit machineconfig -n [nodeIP]” will bring up the bare metal server network config and you can modify it as if you’re editing a yaml file:
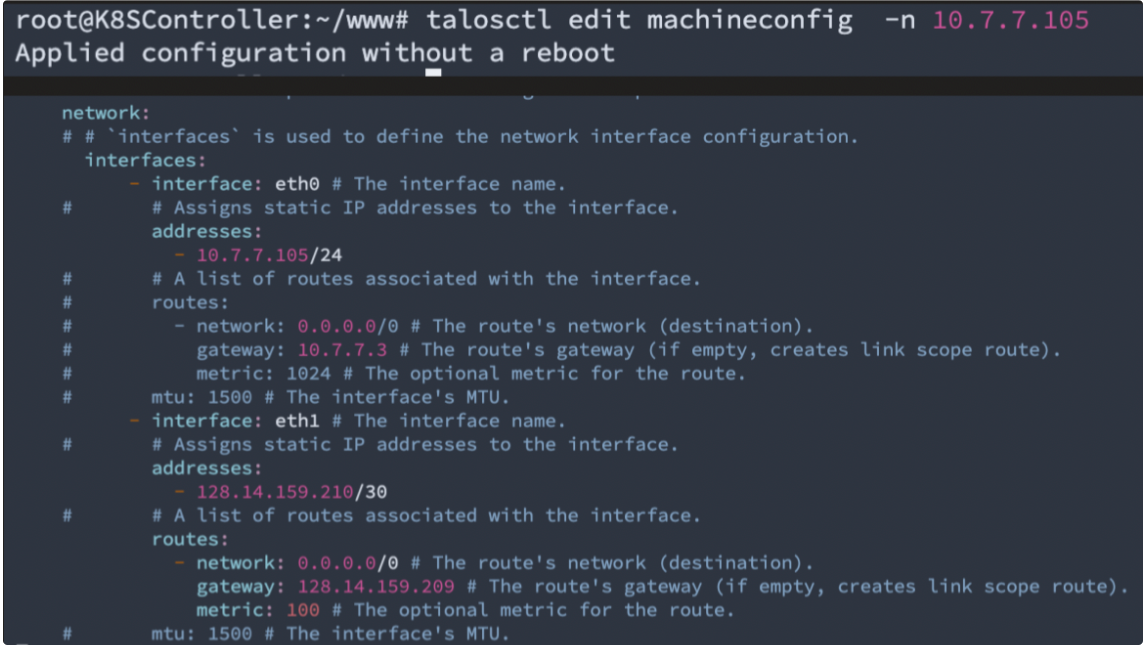
Please note that you can also go with the “apply yaml file“ method if you feel uncomfortable with direct edit. Everything is over the API call and in Kubernetes style.
You can find the full networking resources list here: https://www.talos.dev/v1.2/learn-more/networking-resources/
Good luck and have fun with Talos Linux!!!