

In a time when instant responses and seamless digital experiences are standard, any business that delivers an online service must ensure performance and reliability everywhere users are.
Whether you’re powering a global AI service, streaming video worldwide, or scaling gaming infrastructure across regions, deployment agility matters now more than ever. Traditional manual setups can’t match increased demand because they are time-intensive, error-prone, and hard to reproduce consistently across environments.
Infrastructure as Code (IaC) rises above traditional deployments by turning your infrastructure into versioned, repeatable configuration files. Instead of clicking through a console or manually typing numerous commands, IaC lets you declare networking, compute, and security resources once and then deploy them anywhere in the world with consistency and confidence.
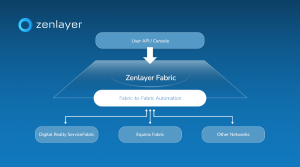
It unlocks traceability and automation that match the speed of modern application development to accelerate delivery, improve reliability, and reduce operational risks for teams managing distributed workloads. On a hyperconnected platform like Zenlayer, with presence in hundreds of cities and edge locations, IaC gives you the ability to scale and adapt infrastructure globally with a clean, predictable blueprint.
In Part 1 of this series, we will automate the deployment of a high-availability web cluster on Zenlayer Elastic Compute (ZEC) using Terraform. By the end of this guide, you will have a fully provisioned Virtual Private Cloud (VPC), secure compute nodes, and a public Load Balancer distributing traffic—all deployed with a single command.
Architecture
We are building a clean “Greenfield” environment in the Los Angeles (na-west-1) region.
- Network: A dedicated VPC (10.0.0.0/16) and subnet
- Compute: Two Ubuntu 20.04 instances using the z2a.cpu.1 standard type
- Security: A “Deny All” firewall policy that strictly permits only SSH (22) and HTTP (80) traffic
- Traffic Management: A TCP Load Balancer acting as the public entry point for our application
For this implementation, we will be using the Zenlayer Terraform Provider registry.
Implementation
Step 1 – Provider and Network Foundation
Every solid infrastructure starts with the network. We configure the provider and define a VPC and Subnet in our target region.
terraform {
required_providers {
zenlayercloud = {
source = "zenlayer/zenlayercloud"
}
}
}

provider "zenlayercloud" {}
# 1. NETWORK
resource "zenlayercloud_zec_vpc" "test_vpc" {
name = "terraform-zec-vpc"
cidr_block = "10.0.0.0/16"
}

resource "zenlayercloud_zec_subnet" "test_subnet" {
vpc_id = zenlayercloud_zec_vpc.test_vpc.id
cidr_block = "10.0.1.0/24"
name = "terraform-zec-subnet"
region_id = "na-west-1"
}
Step 2 – Security Groups
For Elastic Compute (ZEC), we use the rule_set resource. This allows us to define our ingress policies atomically, ensuring the Security Group is fully configured with the correct rules the moment it is created.
# 2. SECURITY GROUP
resource "zenlayercloud_zec_security_group" "web_sg" {
name = "terraform-zec-sg"
}

resource "zenlayercloud_zec_security_group_rule_set" "web_rules" {
security_group_id = zenlayercloud_zec_security_group.web_sg.id

# Allow SSH
ingress {
policy = "accept"
port = "22"
protocol = "tcp"
cidr_block = "0.0.0.0/0"
priority = 1
}

# Allow HTTP
ingress {
policy = "accept"
port = "80"
protocol = "tcp"
cidr_block = "0.0.0.0/0"
priority = 1
}
}
Step 3 – Dynamic Compute Provisioning
Hardcoding image IDs can be a bit brittle because they can change over time. Instead, I used a data source to query the Zenlayer API for the current valid ID for “Ubuntu 20.04” in our availability zone. The data source returns a list of all images that match our regex and then we grab the first result in that list in the image_id. You could hardcode a specific id in the image_id field if you prefer.
# 0. DATA SOURCES
data "zenlayercloud_zec_images" "ubuntu" {
image_name_regex = "^Ubuntu Server 20.04"
availability_zone = "na-west-1a"
}

# 3. COMPUTE
resource "zenlayercloud_zec_instance" "web_nodes" {
count = 2
instance_name = "tf-zec-node-${count.index + 1}"
instance_type = "z2a.cpu.1"
image_id = data.zenlayercloud_zec_images.ubuntu.images[0].id
subnet_id = zenlayercloud_zec_subnet.test_subnet.id
security_group_id = zenlayercloud_zec_security_group.web_sg.id
availability_zone = "na-west-1a"
password = "ZenTest!2025"
system_disk_size = 40
depends_on = [zenlayercloud_zec_security_group_rule_set.web_rules]
}
Step 4 – Load Balancing
Finally, we place a Load Balancer in front of our private instances. The load balancer distributes incoming network traffic across multiple backend servers, while a Listener is a specific configuration within the load balancer that listens for connections. In our case, the listener is looking for TCP connections on port 80 – we also specified full network address translation forwarding mode and Maglev Hashing (mh) as the scheduling algorithm. A key detail here is the Listener ID. The Zenlayer Terraform provider returns a composite ID (e.g., lb-xxx:listener-yyy), but the backend attachment resource expects only the listener ID (the second part) – so the standard approach is to use Terraform’s split function to isolate the listener ID.
# 4. LOAD BALANCER
resource "zenlayercloud_zlb_instance" "web_lb" {
zlb_name = "tf-zec-lb"
region_id = "na-west-1"
vpc_id = zenlayercloud_zec_vpc.test_vpc.id
depends_on = [zenlayercloud_zec_subnet.test_subnet]
}

resource "zenlayercloud_zlb_listener" "http" {
zlb_id = zenlayercloud_zlb_instance.web_lb.id
listener_name = "http-80"
protocol = "TCP"
port = 80
health_check_enabled = true
health_check_type = "TCP"
scheduler = "mh"
kind = "FNAT"
}

resource "zenlayercloud_zlb_backend" "attach_vms" {
count = 2
zlb_id = zenlayercloud_zlb_instance.web_lb.id
listener_id = split(":", zenlayercloud_zlb_listener.http.id)[1]
backends {
instance_id = zenlayercloud_zec_instance.web_nodes[count.index].id
private_ip_address =
tolist(zenlayercloud_zec_instance.web_nodes[count.index].private_ip_addr
esses)[0]
port = 80
}
}
Step 5 – Outputs
We define outputs so the terminal tells us exactly what IPs we need to know after the build finishes.
# 5. OUTPUTS
output "load_balancer_ip" {
value = zenlayercloud_zlb_instance.web_lb.public_ip_addresses
}

output "vm_public_ips" {
value = zenlayercloud_zec_instance.web_nodes[*].public_ip_addresses
}
Outcome
Running ‘terraform plan’ and then ‘terraform apply’ results in a clean deployment of all resources:
Apply complete! Resources: 10 added, 0 changed, 0 destroyed
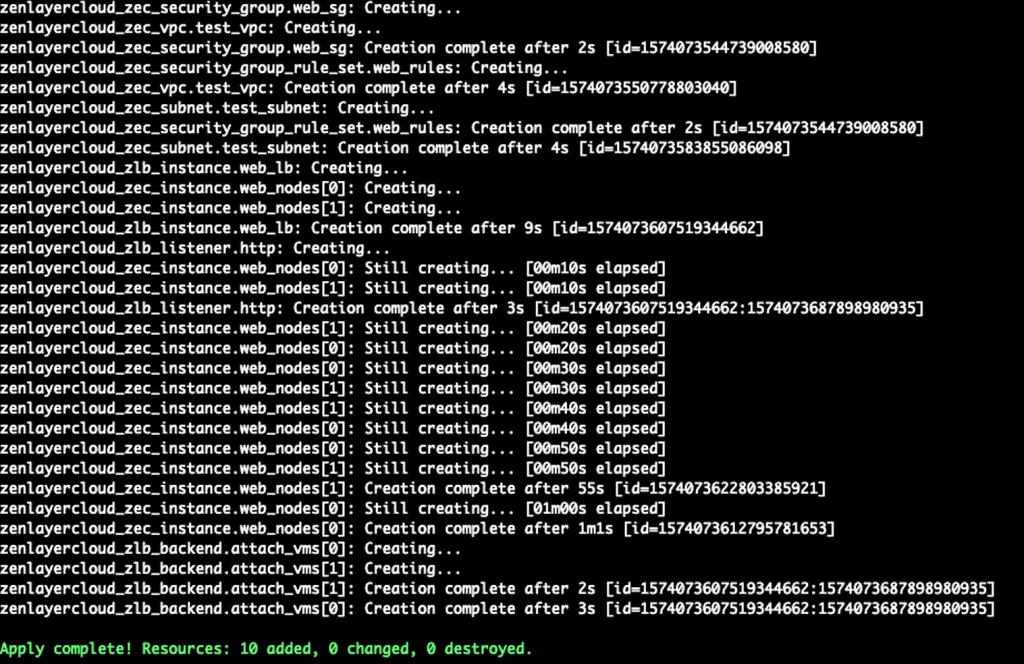
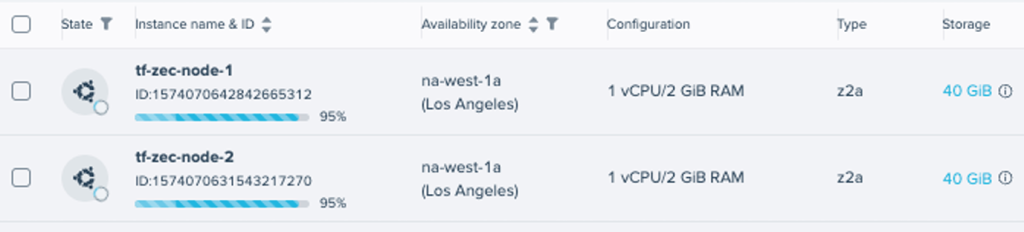
While those changes were being applied, we could see the instances being created in the console.
We now have a robust, production-ready infrastructure foundation. However, our servers are currently blank slates—they aren’t serving any content yet.
You can find the complete, ready to deploy Terraform blueprint for this project over on my github here: Zenlayer IaC Starter Repository
Coming soon
In Part 2, we will shift from infrastructure to configuration. We will use Ansible to automatically connect to these new instances, install Nginx, and deploy our web application